Candy Houses
By Victoria Shearer
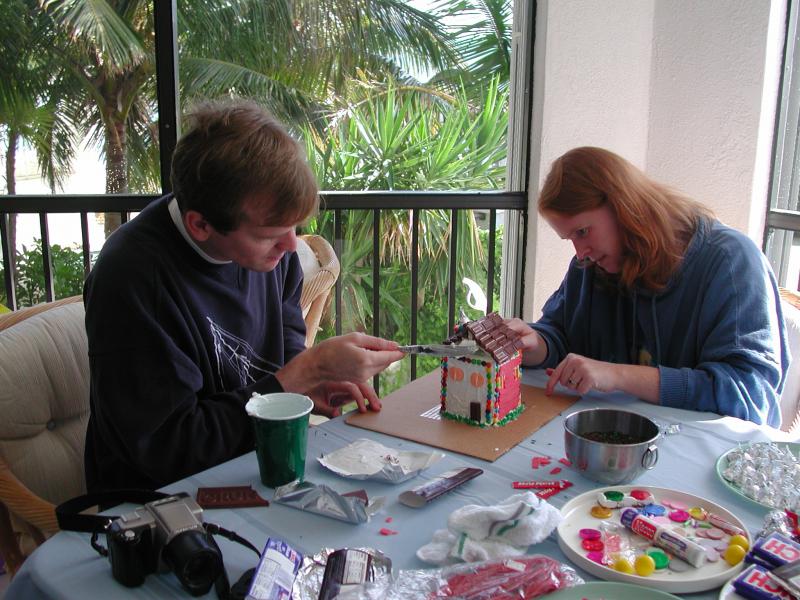
 Ask my grown-up children and they’ll tell you, “Christmas wasn’t Christmas without a candy house!” And now that I’m a grandmother, our sweet family tradition carries on with my grandkids. Each December, we create a candy village, kids and grown-ups too, which is displayed until Christmas Day. From then on, throughout the holidays, sweet-tooths of all ages eat the candy off the houses, dismantling everything from roof tiles to windowpanes.
Building Your Dream House
Similar in concept to a gingerbread house, but easier to make and much more fun to eat, a candy house begins with simple cardboard carton or foam core construction. The shell is covered with royal icing, which dries like cement, and is completely covered with a wide assortment of candies.
The Shell
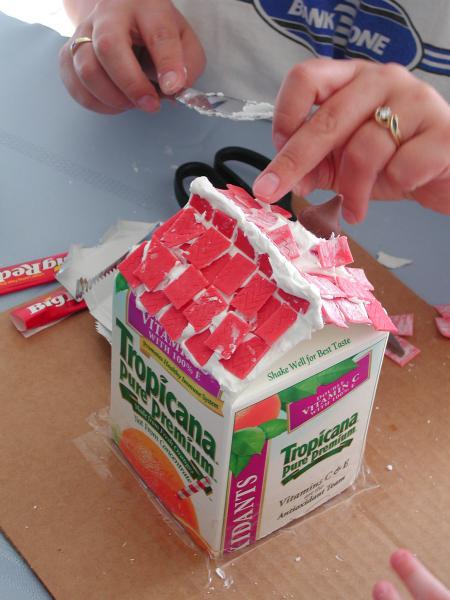
For a small candy “row” house, the perfect size for a child’s dexterity and attention span, use an empty half-gallon cardboard orange juice carton as the base structure. (I like to use Tropicana® because the pour-spout makes a great base for the chimney.) With a serrated knife or box cutter, cut off the bottom three inches of the carton and stuff it inside the upper part of the carton for extra stability. Then, with mailing or strapping tape, tape the house securely to a piece of foam core or heavy cardboard that measures at least 8x11 inches.
For a bigger house, begin with a Pepperidge Farm Goldfish® carton and glue it on a large piece of foam core with Elmer’s Glue-All™ (you may want to tape the carton in place as well, for extra reinforcement).
For adults or budding teenage architects who would enjoy a real creative challenge, you can design and assemble a candy mansion, such as a Georgian Colonial, out of foam core and glue it to a 20x30-inch piece of heavy foam core. This grand structure, on its “2-acre plot” allows your imagination to run wild, creating candy swimming pools, skating ponds, gift-filled sleighs, walks and driveways, balconies, pillars, and pediments. The possibilities are endless.
The Mortar
The key to a successful candy house is royal icing, a combination of egg whites, confectioner’s sugar, and cream of tartar. This spreadable icing-glue holds the candies in place and dries like cement (see recipe). Each batch of this royal icing recipe is enough to build one “row” house and can be keep in a covered container in the refrigerator for a week or more. Bring icing to room temperature before you begin decorating your candy house.

Royal Icing
3½ cups confectioner’s sugar, packed
⅓ cup egg whites (2 large eggs) at room temperature
¼ teaspoon cream of tartar
Sift confectioner’s sugar through a strainer or a sifter into a medium bowl. In a large bowl, beat egg whites for about 30 seconds. Add 2 cups sugar, one cup at a time, beating well and scraping the bowl until well mixed. Beat in cream of tartar; then beat in rest of sugar, one cup at a time until well mixed. (You’ll have about 4¼ cups sifted sugar.) Place icing in a covered container and refrigerate until using.
Decorate the candy house in small sections so that the icing remains soft and does not begin to firm up. If a crust does develop, place a knife under hot water for a few seconds, then just briefly hold it against the spread icing. The icing will soften up. Use a narrow rigid spatula for large areas such as the roof, walls, and yard. Use a table knife for small areas and to place dabs on individual candies. Always coat the cardboard surface with icing before “gluing” individual candies onto the house. Be sure to re-cover the container of icing when you are placing the candies on the house so the icing doesn’t dry out.
The Building Materials
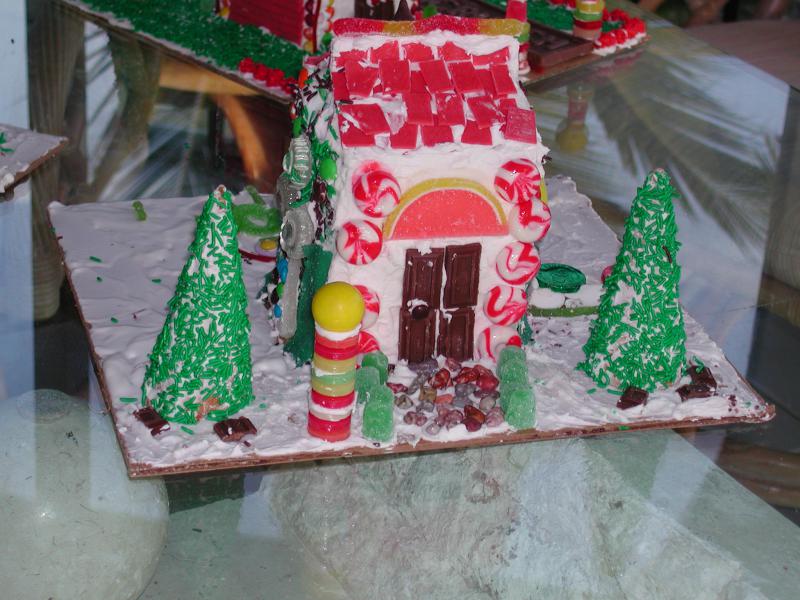
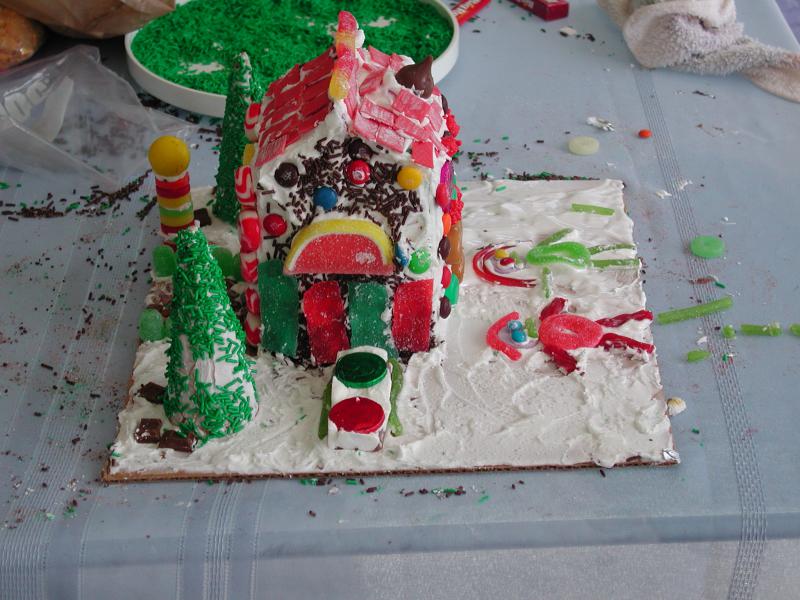
Begin at the top, with the roof, chimney, fascia board, gutters and trim, and work your way down the house so that you don’t accidentally knock off candies you have already secured. After the roof, fashion siding, windows, doors; railings, columns, and Christmas lights; then shrubbery, trees, walkways, driveways, and snow-covered lawns; finally, the extras such as a swimming pool, ice skating pond, sleigh full of gifts, street lights, and mail boxes.
Choices of candies are limited only to your imagination. Staples include Hershey’s chocolate bars, M&M’s, licorice, LifeSavers, gumdrops, ice cream cones, green
sprinkles, Necco wafers, and candy canes. For extra special effects, visit a candy store that offers bin candy.
Here are some ideas to get you started:
- Roof tiles – Chocolate nonpareils (Tip: Place nonpareils in an even layer on the roof, then put a second layer over the spaces. Join the two sides with a strip of candies across the roof ridge.) Necco candy wafers (Tip: Begin at lower edge of roof and work upward. Place wafers in overlapping staggered layers.) Hershey chocolate squares (Tip: Break chocolate at indicated ridges and place at an angle working from lower edge of roof upwards.)
- Chimney – Licorice squares, tootsie rolls, Rollos. (Tip: Cut candy at the same angle as the roof.)
- Gutters and trim – Licorice Twizzlers, gummy rope, licorice rope.
- Fascia board – Sticks of gum.
- Siding – M&M’s (mini and regular) for stone, small chocolate chunks for brick, Good & Plenty for vertical siding, Necco wafers or gum sticks for shingles.
- Conventional windows – Hersheys chocolate squares.
- Palladian arched windows – gummy grapefruit triangle slices, half moons, and citrus candy slices.
- Doors – Hershey’s milk chocolate or Crunch rectangles.
- Railings – Lifesavers on end.
- Columns – Lifesavers or Werther’s Originals stacked, candy canes, licorice Twizzlers.
- Christmas lights – Gummy day-glow worms.
- Shrubbery – Gummy frogs (Tip: For evergreen shrubbery, “cement” two frogs together, green side out and then place along base of the house.) Red candy-coated peanuts (Tip: For burning bushes cement mounds of peanuts along base of house) Gumdrops cemented in mounds. Marshmellows (Tip: For snow-covered bushes.)
- Trees – Sugar cones covered with icing and rolled in green sprinkles or green sugar crystals.
- Walkways and driveways – Candy stones or Hershey’s Crunch bars.
- Snow-covered lawn – Flaked coconut or miniature marshmallows.
- Swimming pool – Blue gummy ribbon surrounded with a fence of Hershey’s Hugs or Kisses. (Tip: Make a diving board from a half stick of gum mounted on a small licorice round.
- Ice skating pond – Blue silver mint hard candies surrounded with rock ice candy.
- Sleigh full of gifts – Candy canes, chocolate bars, foil covered coins, foil wrapped “package” candy. (Tip: For the sleigh, “glue” coins around perimeter of a rectangle of chocolate; allow them to dry. With icing, cement candy cane runners to frosted yard, then “cement” sleigh to runners. Fill with candy packages.)
- Street lights – Tootsie Roll post or 2-inch straight candy cane stuck in half marshmallow topped with gum ball light globe.
- Mailbox – 2-inch licorice Twizzler stuck in half marshmallow, topped with licorice log.
- Benches – Foam candy
- Snow angels – Gummy wreaths for bodies, Necco wafer for head, miniature M&M’s for eyes, licorice sticks for arms and legs, licorice or gummy rope for angel wing marks in snow.
Home Maintenance Tips
 Keep a covered container of icing on hand in the refrigerator for a quick fix, in case any of the candies fall off unintentionally.
- If icing is cement hard when you intentionally take the candy off the house to eat it, run the candy under hot water briefly and it will soften.
- The candy house will last for months, but the longer the candies are exposed to the air, the harder they will become.
What do you do when life gives you egg yolks? Make eggnog!
You’ll have lots of egg yolks left after making several batches of Royal Icing, so use them to create even more Christmas cheer. Try this yummy, safe, easy recipe for eggnog, which was adapted from The Boston Globe.
Eggnog
- 6 egg yolks
- ¾ cup sugar
- ¼ teaspoon ground nutmeg
- 1½ tablespoons vanilla extract
- ½ pint heavy cream
- 1 pint fat-free half and half
1. In a medium saucepan, whisk together egg yolks, sugar, nutmeg, and vanilla until smooth. Then whisk in heavy cream and half-and-half until well blended.
2. Place saucepan on stove over low heat and heat eggnog mixture, stirring often, until it reaches 160ºF on an instant read thermometer. If you don’t have such a thermometer, heat eggnog mixture on low heat for one hour, stirring often. Make sure mixture is heated through but that it does not bubble or boil.
3. Remove saucepan from heat and transfer eggnog to a pitcher. Cover with a lid or saran wrap and refrigerate until chilled.
Serves 6 to 8.
Victoria Shearer is the author of Leftover Makeovers: Great New Meals from Last Night's Dinner, Slow Cooker Classics from Around the World: Fresh Ideas for Slow Cooking, Quick, Cheap Comfort Food: 100+ Fresh Recipes for Meals in a Hurry, and other cookbooks that contain recipes your kids will love to cook with you... and eat!